sudo apt install libnss-ldapd libpam-ldapd
sudo vi /etc/nslcd.conf
#Create home directory on login
sudo pam-auth-update
#/etc/lightdm/lightdm.conf.d/99-multiseat.conf
[Seat:*]
greeter-hide-users=false
greeter-show-manual-login=true
allow-guest=false
[Seat:*]
greeter-hide-users=false
greeter-show-manual-login=true
allow-guest=false
AllowInsecureGuestAuth specifies whether the SMB client will allow insecure guest logons to an SMB server.
| Value | Description |
|---|---|
| 0 | SMB client rejects insecure guest logons. This is the default, and recommended, value. |
| 1 | SMB client allows insecure guest logons. |
ssh 140.112.xxx.xxx -L 1234:localhost:1234PuTTY on Windows
. keras/bin/activate
pip install jupyter
jupyter notebook --no-browser --port=1234
http://localhost:1234?token=xxxxxxxxxx

sudo apt-get install sssd heimdal-clients msktutil libnss-sss libpam-sssYou can leave the default Kerberos realm blank, it will be configured later.
[libdefaults]
        default_realm = ZENTYAL-DOMAIN.LAN
        rdns = no
        dns_lookup_kdc = true
        dns_lookup_realm = false
Pay attention to the indentation, there is a
127.0.0.1       localhost
127.0.1.1       lubuntu.zentyal-domain.lan  lubuntu
As the regular user, get the Kerberos ticket of the domain admin:
user@lubuntu:~$ kinit Administrator
Administrator@ZENTYAL-DOMAIN.LAN's Password:
user@lubuntu:~$ klist
Credentials cache: FILE:/tmp/krb5cc_1001
        Principal: Administrator@ZENTYAL-DOMAIN.LAN

  Issued                Expires               Principal
Jul 17 22:30:04 2014  Jul 18 08:29:53 2014  krbtgt/ZENTYAL-DOMAIN.LAN@ZENTYAL-DOMAIN.LAN
You will now generate the Kerberos principals for this host, replace
the host names for the client and the server, and again, pay attention
to the capitalization:
user@lubuntu:~$ msktutil -N -c -b 'CN=COMPUTERS' -s HOST/lubuntu.zentyal-domain.lan -k test.keytab --computer-name LUBUNTU --upn LUBUNTU$ --server zentyal.zentyal-domain.lan --user-creds-onlyNow, you should be able to see your host name on Zentyal's LDAP tree:--verboseuser@lubuntu:~$ msktutil -N -c -b 'CN=COMPUTERS' -s HOST/lubuntu -k test.keytab --computer-name LUBUNTU --upn LUBUNTU$ --server zentyal.zentyal-domain.lan --user-creds-only--verbose

user@lubuntu:~$ kdestroyCopy the keytab file to /etc/sssd:
user@lubuntu:~$ sudo cp test.keytab /etc/sssd/as a superuser, create the file /etc/sssd/sssd.conf with the content:
[sssd] services = nss, pam config_file_version = 2 domains = zentyal-domain.lan [nss] entry_negative_timeout = 0 debug_level = 5 [pam] debug_level = 5 [domain/zentyal-domain.lan] debug_level = 10 enumerate = false id_provider = ad auth_provider = ad chpass_provider = ad access_provider = ad dyndns_update = false ad_hostname = zentyal.zentyal-domain.lan ad_server = zentyal.zentyal-domain.lan ad_domain = zentyal-domain.lan ldap_schema = ad ldap_id_mapping = true fallback_homedir = /home/%u default_shell = /bin/bash ldap_sasl_mech = gssapi ldap_sasl_authid = LUBUNTU$ krb5_keytab = /etc/sssd/test.keytab ldap_krb5_init_creds = true
ad_gpo_access_control = disabled
replace domain and host names where necessary, the parameter krb5_keytab should point to the keytab you created and copied.
root@lubuntu:/etc/sssd# sudo chmod 0600 sssd.confAnd restart the SSSD service
root@lubuntu:/etc/sssd# sudo service sssd restart stop: Unknown instance: sssd start/running, process 1671Now, as a superuser, edit the file /etc/pam.d/common-session and below the line
session required pam_unix.soAdd the line
session required pam_mkhomedir.so skel=/etc/skel umask=0077Now, you should be able to login as any domain user:


sudo apt-get install sssd heimdal-clients msktutil libpam-sss libnss-sssYou can leave the default Kerberos realm blank, it will be configured later.
[libdefaults] default_realm = ZENTYAL-DOMAIN.LAN rdns = no dns_lookup_kdc = true dns_lookup_realm = falsePay attention to the indentation, there is a
127.0.0.1 localhost 127.0.1.1 lubuntu.zentyal-domain.lan lubuntuAs the regular user, get the Kerberos ticket of the domain admin:
user@lubuntu:~$ kinit Administrator
Administrator@ZENTYAL-DOMAIN.LAN's Password:
user@lubuntu:~$ klist
Credentials cache: FILE:/tmp/krb5cc_1001
Principal: Administrator@ZENTYAL-DOMAIN.LAN
Issued Expires Principal
Jul 17 22:30:04 2014 Jul 18 08:29:53 2014 krbtgt/ZENTYAL-DOMAIN.LAN@ZENTYAL-DOMAIN.LAN
You will now generate the Kerberos principals for this host, replace
the host names for the client and the server, and again, pay attention
to the capitalization:
user@lubuntu:~$ msktutil -N -c -b 'CN=COMPUTERS' -s HOST/lubuntu.zentyal-domain.lan -k test.keytab --computer-name LUBUNTU --upn LUBUNTU$ --server zentyal.zentyal-domain.lan --user-creds-only --verbose

user@lubuntu:~$ msktutil -N -c -b 'CN=COMPUTERS' -s HOST/lubuntu -k test.keytab --computer-name LUBUNTU --upn LUBUNTU$ --server zentyal.zentyal-domain.lan --user-creds-only --verbose
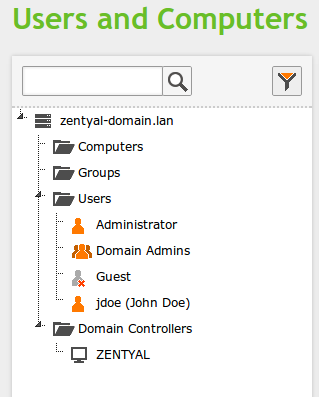
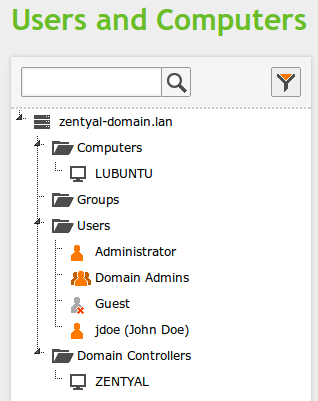
Now, you should be able to see your host name on Zentyal's LDAP tree:

user@lubuntu:~$ kdestroyCopy the keytab file to /etc/sssd:
user@lubuntu:~$ sudo cp test.keytab /etc/sssd/as a superuser, create the file /etc/sssd/sssd.conf with the content:
[sssd] services = nss, pam config_file_version = 2 domains = zentyal-domain.lan [nss] entry_negative_timeout = 0 debug_level = 5 [pam] debug_level = 5 [domain/zentyal-domain.lan] debug_level = 10 enumerate = false id_provider = ad auth_provider = ad chpass_provider = ad access_provider = ad dyndns_update = false ad_hostname = zentyal.zentyal-domain.lan ad_server = zentyal.zentyal-domain.lan ad_domain = zentyal-domain.lan ldap_schema = ad ldap_id_mapping = true fallback_homedir = /home/%u default_shell = /bin/bash ldap_sasl_mech = gssapi ldap_sasl_authid = LUBUNTU$ krb5_keytab = /etc/sssd/test.keytab ldap_krb5_init_creds = truereplace domain and host names where necessary, the parameter krb5_keytab should point to the keytab you created and copied.
root@lubuntu:/etc/sssd# sudo chmod 0600 sssd.confAnd restart the SSSD service
root@lubuntu:/etc/sssd# sudo service sssd restart
stop: Unknown instance:
sssd start/running, process 1671
Now, as a superuser, edit the file /etc/pam.d/common-session and below the line
session required pam_unix.soAdd the line
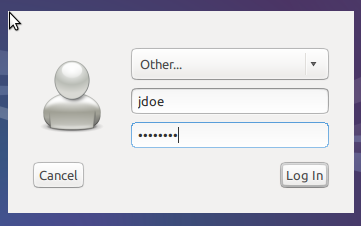
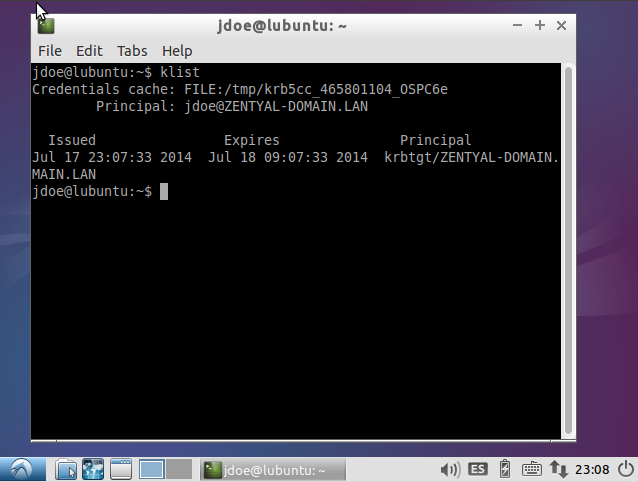
session required pam_mkhomedir.so skel=/etc/skel umask=0077Now, you should be able to login as any domain user:


net.ipv6.conf.all.forwarding=1
net.ipv6.conf.ppp0.accept_ra=2
ipv6 ,/etc/ppp/ipv6-up.d/radvd (or anything you like)
/etc/init.d/wide-dhcpv6-client restart/etc/wide-dhcpv6/dhcp6c.conf
/etc/init.d/radvd restart
interface ppp0 {/etc/radvd.conf
send ia-pd 0;
};
id-assoc pd 0 {
prefix-interface eth0 {
sla-len 0;
sla-id 1;
};
};
interface eth0
{
AdvSendAdvert on;
prefix ::/64
{
AdvOnLink on;
AdvAutonomous on;
AdvRouterAddr on;
};
};